How To How to pass values from Google Analytics into a form and onto a Salesforce Campaign
The holy grail of attribution within Salesforce is to be able to pass values from Google Analytics (including UTM parameters) into hidden form fields and then pass those values into a Salesforce Campaign Member record.
Here's a brief video of the end result:
In this blog post I’m going to take you step-by-step through how to set this up. While the number of steps might seem a little daunting at first, I assure you this is a relatively easy process that will pay dividends for years to come.
1.) Add Google Analytics to your website
Most likely you already have Google Analytics installed on your website. If you do, you can skip this step. If not, follow these steps to install Google Analytics.
First, go to the Google Analytics website and create an account if you do not already have one.
Once logged in, click on "Admin".
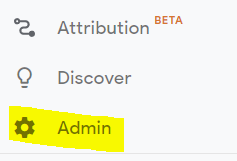
Then under "Property", click on "Tracking Info" then "Tracking Code".
Under "Website Tracking", follow the instructions to add the Google Analytics tracking code to your website.

2.) Add Google Tag Manager to your website
If you haven’t already, go to Google Tag Manager and create an account. It is a free service offered by Google.
Once logged in, find and click on your Workspace ID:

You should now see instructions for installing Google Tag Manager on your website. Note that you need to add two snippets of code to your website.
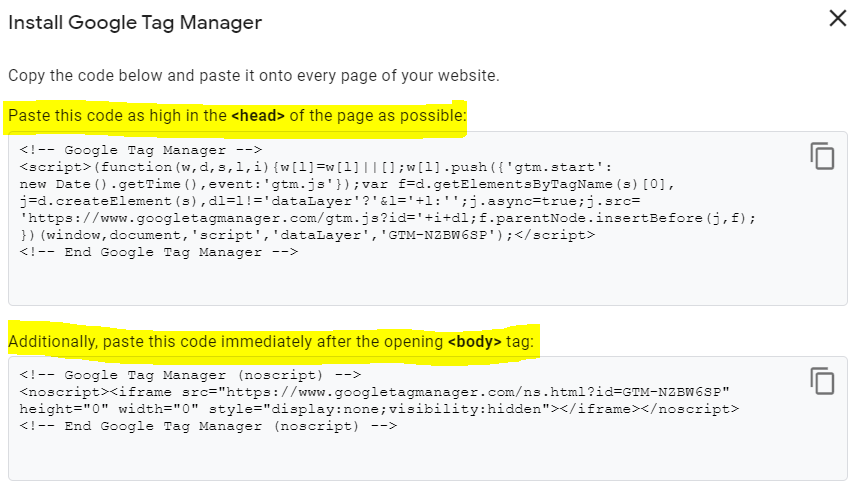
Do not use the code above – copy and paste from your Google Tag Manager account.
3.) Configure script in Google Tag Manager to parse Google Analytics cookie and set custom cookie
First, download the GA Custom Cookie Script (credit goes to E-Nor).
Second, you will see a line to set your top-level domains. Replace "align.ly" with your website domain. This also supports multi top-level domains – simply add commas (ie "align.ly","alignly.com").

Now that your script is ready, go to Google Tag Manager and click on "Tags" -> "New" -> Name it "GA Custom Cookie Script" and then click on "Tag Configuration" -> "Custom HTML" -> and paste in your script.
Next, click on "Triggering" and select "All Pages".
4.) Configure script in Google Tag Manager to apply values from cookie to hidden form fields
First, download the GA Cookie Extraction Script (credit goes to Pepperland Marketing).
Next, update your domain in the script.

Now that your script is ready, go to Google Tag Manager and click on "Tags" -> "New" -> Name it "GA Cookie Extraction Script" and then click on "Tag Configuration" -> "Custom HTML" -> and paste in your script.
Next, click on "Triggering" and select "All Pages".
5.) Push Google Tag Manager changes live
In Google Tag Manager, click on "Submit" and then "Publish".
Congrats! The hardest part is over.
6.) Add properties/fields to contact in your marketing automation platform
Properties/fields to create on contact in your marketing automation platform:
- GA Campaign
- Field type: text
- Field name: ga_campaign
- GA Source
- Field type: text
- Field name: ga_source
- GA Medium
- Field type: text
- Field name: ga_medium
- GA Content
- Field type: text
- Field name: ga_content
- GA Term
- Field type: text
- Field name: ga_term
- Landing Page
- Field type: text
- Field name: landing_page
- Conversion Page
- Field type: text
- Field name: conversion_page
7.) Create fields on Lead, Contact, and Campaign Member in Salesforce
We are going to want to create the following fields on Lead, Contact, and Campaign Member in Salesforce. Yes, unfortunately we have to create the same fields 3 times.
- GA Campaign
- Field type: text (255)
- Field name: GA_Campaign
- GA Source
- Field type: text (255)
- Field name: GA_Source
- GA Medium
- Field type: text (255)
- Field name: GA_Medium
- GA Content
- Field type: text (255)
- Field name: GA_Content
- GA Term
- Field type: text (255)
- Field name: GA_Term
- Landing Page
- Field type: text (255)
- Field name: Landing_Page
- Conversion Page
- Field type: text (255)
- Field name: Conversion_Page
8.) Map Lead fields to Contact fields in Salesforce
In Salesforce Lightning, go to Setup -> Object Manager -> Lead – > Fields & Relationships -> then click the "Map Lead Fields" button.
Map all the Lead fields created in Step #7 to the Contact fields also created in Step #7. Click "Save".
9.) Map Lead/Contact fields in Salesforce to the Contact properties/fields in your marketing automation
This will most likely be done in your marketing automation tool and since each platform is different, I can’t give detailed instructions.
The goal is to sync the Contact fields from your marketing automation platform to the Lead/Contact fields in Salesforce.
10.) Add hidden fields to your forms
Now that we’ve created all our fields and they are syncing, we want to add hidden fields to our forms. At Align.ly, we use HubSpot, so I’m going to show you how we set this up internally. For other marketing automation platforms the process should be similar.
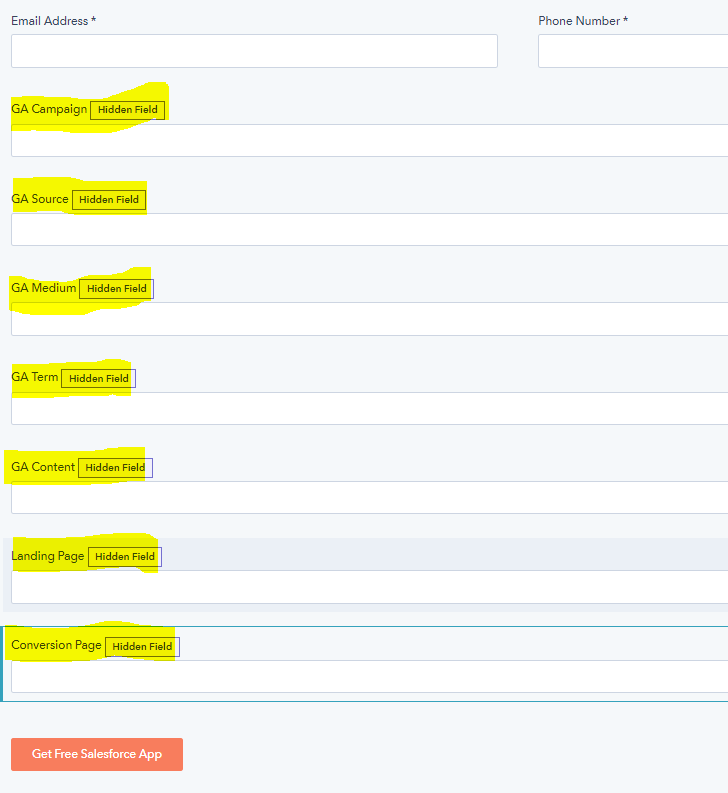
Note that it is important that the "name" fields in your GA Cookie Extraction Script match up with the "name" fields in your hidden form fields.

Once this step is complete, you should now be able to pass values from your Google Analytics cookie into the hidden form fields. Upon form submission the values will populate in your marketing automation platform and then sync over to Salesforce – brilliant!
11.) Populate GA values on Campaign Member when a Lead/Contact is added into a Salesforce Campaign
Up until this step, you have the GA values on Lead/Contact in Salesforce, but what happens if someone interacts with more than one campaign? Do you overwrite the values? Not record subsequent engagement? Of course not. This is where mapping values to Campaign Member is super valuable. Here are the steps"
In Salesforce, go to Setup -> Create -> Workflows & Approvals -> Workflows
Click "New Rule" -> Select "Campaign Member" -> Name it "Update GA Values on Campaign Member" and then configure as follows:
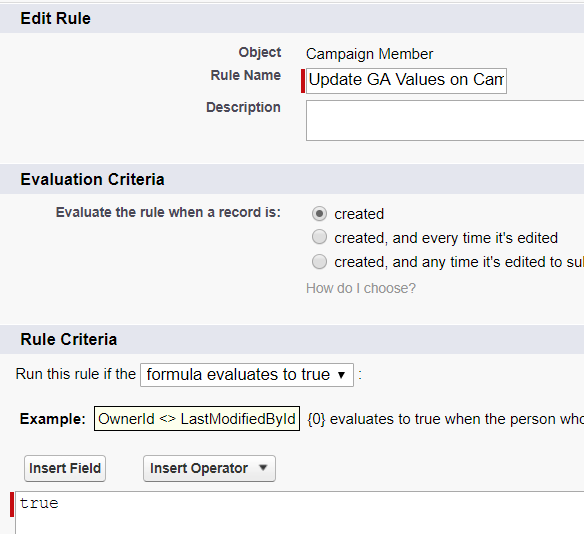
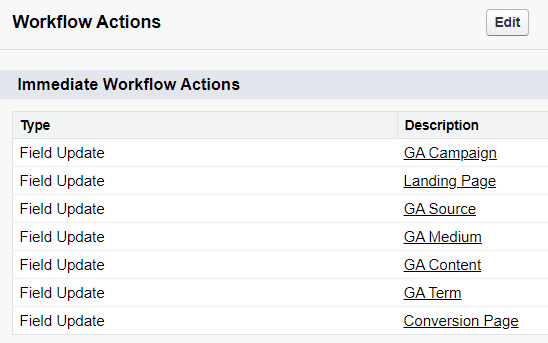
Now we are going to add 7 field updates to map the values from Lead/Contact to Campaign Member.
Click "Add Workflow Action" -> "New Field Update" and configure as follows:
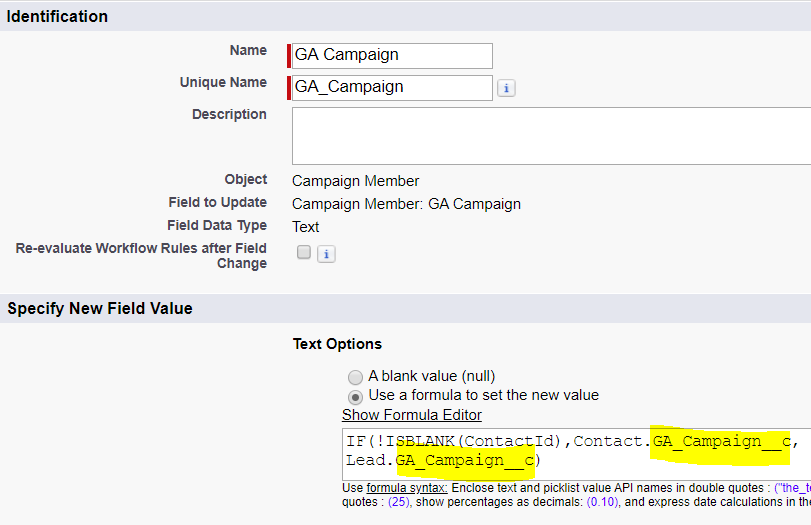
Note the Field API Name in the formula field.
Now add field updates for the remaining 6 fields making sure to swap out the Field API Name in the formula field. It should look like this when done:
Now go ahead and "Activate" the workflow rule.
12.) Clear GA Values on Lead/Contact in our marketing automation platform and Salesforce
Now that we mapped the GA Values to Campaign Member, we can now clear the values in our marketing automation platform and Salesforce.
There are a few different way to accomplish this in either your marketing automation platform or Salesforce. Here’s how we did it in HubSpot:
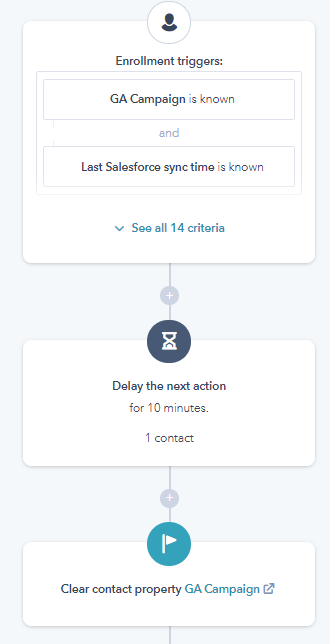
This is just a partial snapshot of the workflow. We check to see if any of the GA field have a value and if they do we clear them all.
Conclusion
That’s it! If you made it this far – congratulations! This was an epic blog post, but we think this can transform how you track and measure your marketing campaigns.
If you have any questions, please feel free to reach out to me at andrew[at]align.ly.
Best of luck and enjoy!
Ready to take the next step? Request a demo today.
We will follow-up with you shortly to schedule a day/time that works for you and your team.
Request a Demo