Playbook How (and Why) to Stamp UTMs on Campaign Member Records in Salesforce
This playbook is designed to be a step-by-step guide on how to stamp UTM parameters on to the Camapign Member record in Salesforce. Note that this is one way of doing this task, but there are multiple ways to accomplish this outcome.
Why stamp UTM parameters on the Campaign Member record?
A common practice is to add hidden fields to the forms on your website to collect the standard UTM parameters. These forms are commonly built using your marketing automation platform (HubSpot, Marketo, Pardot, etc), collected at the contact level, and then synced to Salesforce as a Lead or Contact.
There are two main issues caused by simply syncing your UTM parameters to the Lead/Contact in Salesforce:
- Storing multiple conversions
- Tying the UTM parameters to a specific campaign
The problem with storing your UTM parameters on Lead/Contact is that there is no good way to store multiple conversion events from the same Lead/Contact. Some companies will store the "first" and "last" UTM parameter values, which is better than storing just the first values or always overwriting the field with the last value, but it still doesn't solve for Leads/Contacts that convert more than two times.
The other problem with simply capturing the UTM parameter on Lead/Contact is that you lose the context as to which marketing campaign or initiative the UTM parameters are tied to. For example, let's say you run a webinar and you promote it via email, Google ads, LinkedIn ads, and organically on Twitter/X and LinkedIn. You would want to know exactly where each registration for the webinar came from, but simply storing it on Lead/Contact will work for the very first conversion event of a net new Lead/Contact, but future conversion events will be nearly impossible to track properly without stamping the UTM parameters on the Campaign Member record for that specific webinar.
How to stamp UTM parameters on the Campaign Member record
As mentioned above, this is one way to stamp UTM parameters on the Campaign Member record, but you may want to tweak the approach based on your Salesforce environment or maybe you have a more elegant way to solve the problem based on your tech stack.
Our approach is going to be to do the following:
- Capture and Store UTM parameters, landing page, and conversion page in hidden fields in form submissions typically using a marketing automation platform (Go To Playbook)
- Pass UTM values, landing page, and conversion page from cookies to hidden fields in a form (Go To Playbook)
- Sync the UTM parameters, landing page, and conversion page to fields on Lead/Contact in Salesforce
- Add the Lead/Contact into a Salesforce Campaign and, using a Salesforce Flow, "stamp" the current UTM values, landing page, and conversion page on Lead/Contact onto the Campaign Member record
Note that this playbook is really going to focus on #4 above.
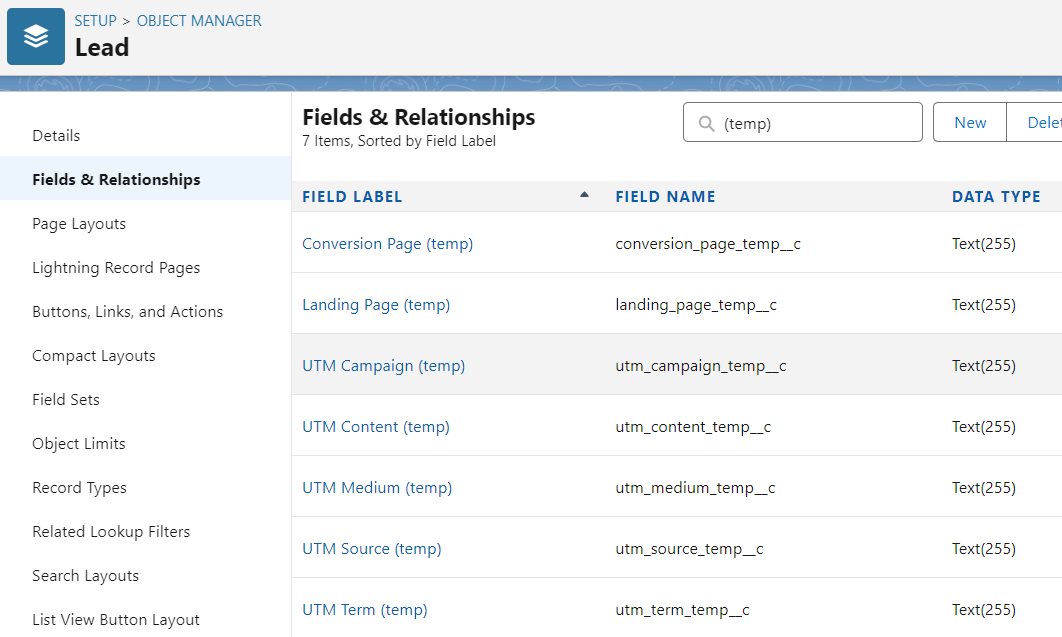
Step #1: Create UTM, landing page, and conversion page fields on Lead
Follow the following steps in Salesforce:
- Go to Setup -> Object Manager -> Lead -> Fields & Relationships
- Create the following 7 fields of type Text(255):
- UTM Campaign (temp) - utm_campaign_temp__c
- UTM Medium (temp) - utm_medium_temp__c
- UTM Source (temp) - utm_source_temp__c
- UTM Term (temp) - utm_term_temp__c
- UTM Content (temp) - utm_content_temp__c
- Landing Page (temp) - landing_page_temp__c
- Conversion Page (temp) - conversion_page_temp__c
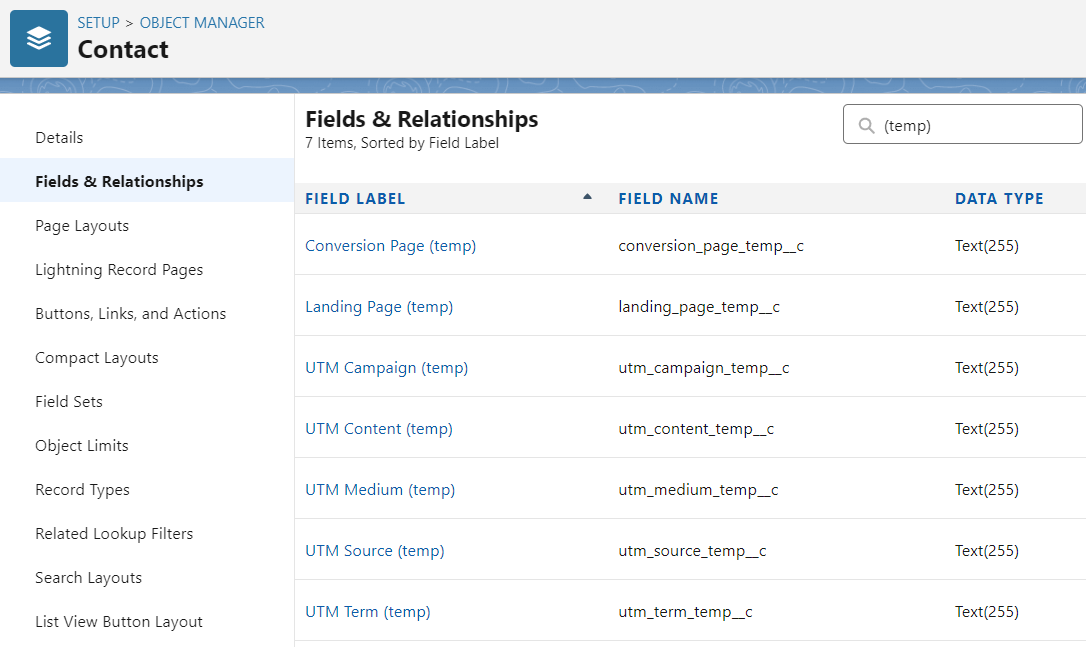
Step #2: Create UTM, landing page, and conversion page fields on Contact
- Go to Setup -> Object Manager -> Contact -> Fields & Relationships
- Create the following 7 fields of type Text(255):
- UTM Campaign (temp) - utm_campaign_temp__c
- UTM Medium (temp) - utm_medium_temp__c
- UTM Source (temp) - utm_source_temp__c
- UTM Term (temp) - utm_term_temp__c
- UTM Content (temp) - utm_content_temp__c
- Landing Page (temp) - landing_page_temp__c
- Conversion Page (temp) - conversion_page_temp__c
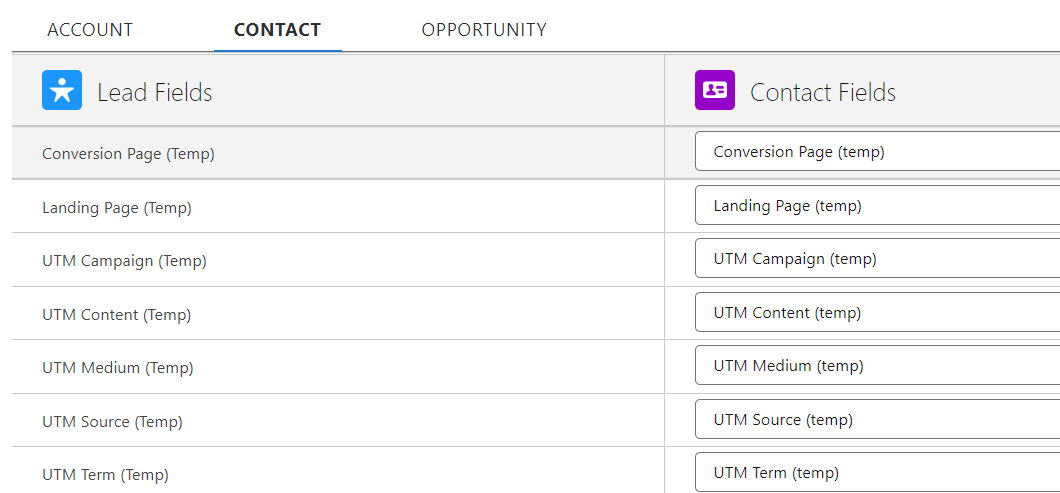
Step #3: Map Lead Fields for the newly created fields on Lead and Contact
- Go to Setup -> Object Manager -> Lead -> Fields & Relationships
- Click the "Map Lead Fields" button (top right)
- Click the "Contact" tab
- Select the corresponding Contact field for each newly created field
- Click "Save"
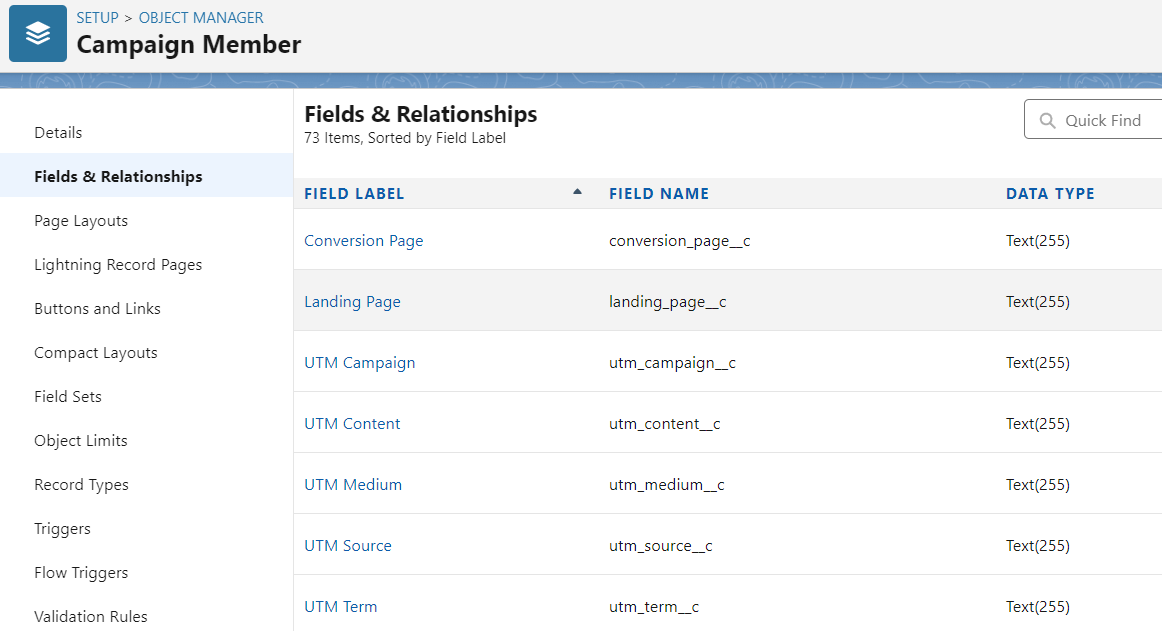
Step #4: Create fields on Campaign Member
- Go to Setup -> Object Manager -> Campaign Member -> Fields & Relationships
- Create the following 7 fields of type Text(255):
- UTM Campaign - utm_campaign__c
- UTM Medium - utm_medium__c
- UTM Source - utm_source__c
- UTM Term - utm_term__c
- UTM Content - utm_content__c
- Landing Page - landing_page__c
- Conversion Page - conversion_page__c
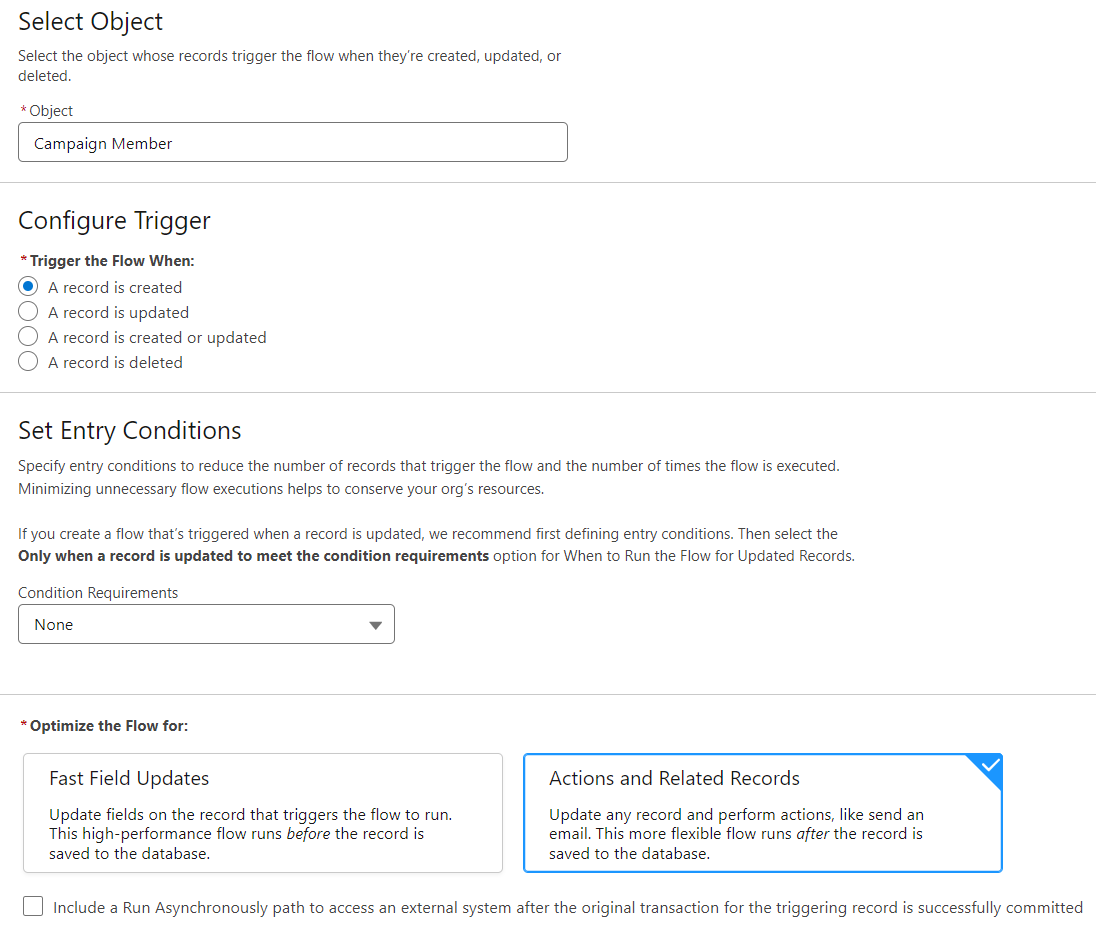
Step #5: Create a Salesforce Flow to "stamp" the UTMs, landing page, and conversion page on Campaign Member
- Go to Setup -> Flows
- Click "New Flow"
- Select "Record-Triggered Flow" -> Create
- Use the following settings for the start criteria:
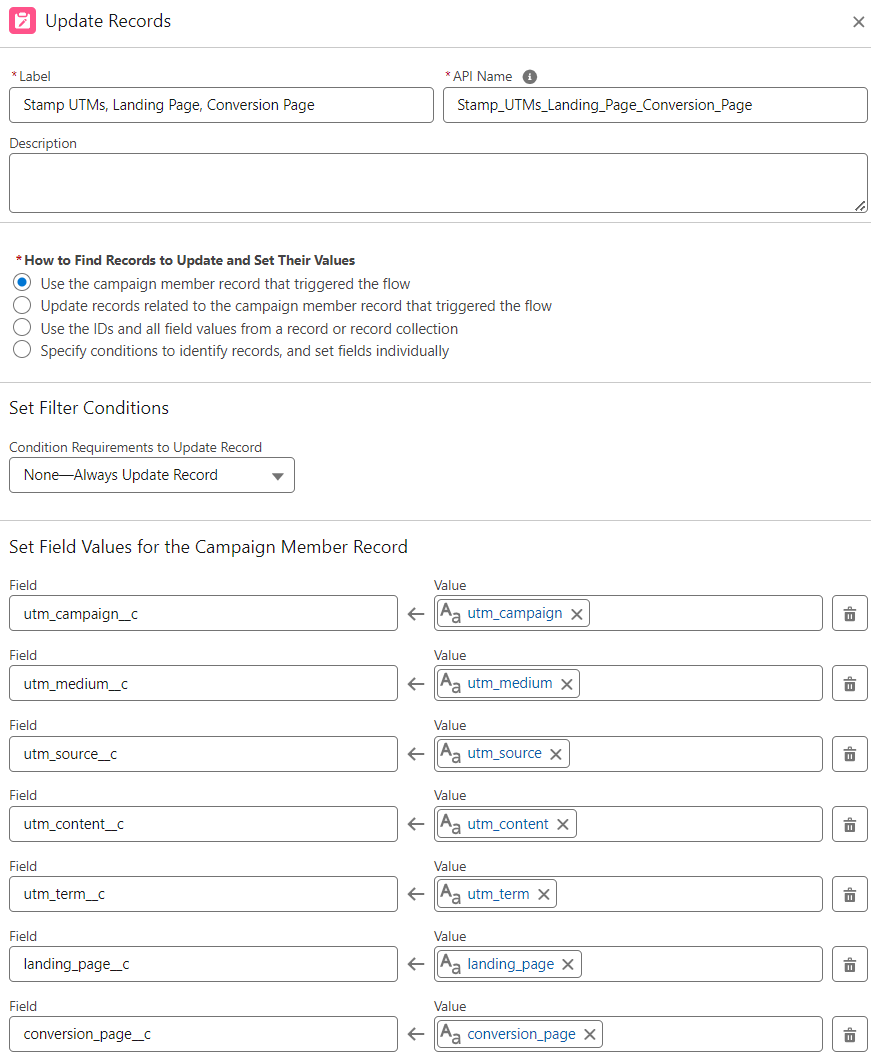
- In the flow, click "Add Element" and select "Update Triggering Record"
- Use the following settings for the "Update Records" step:
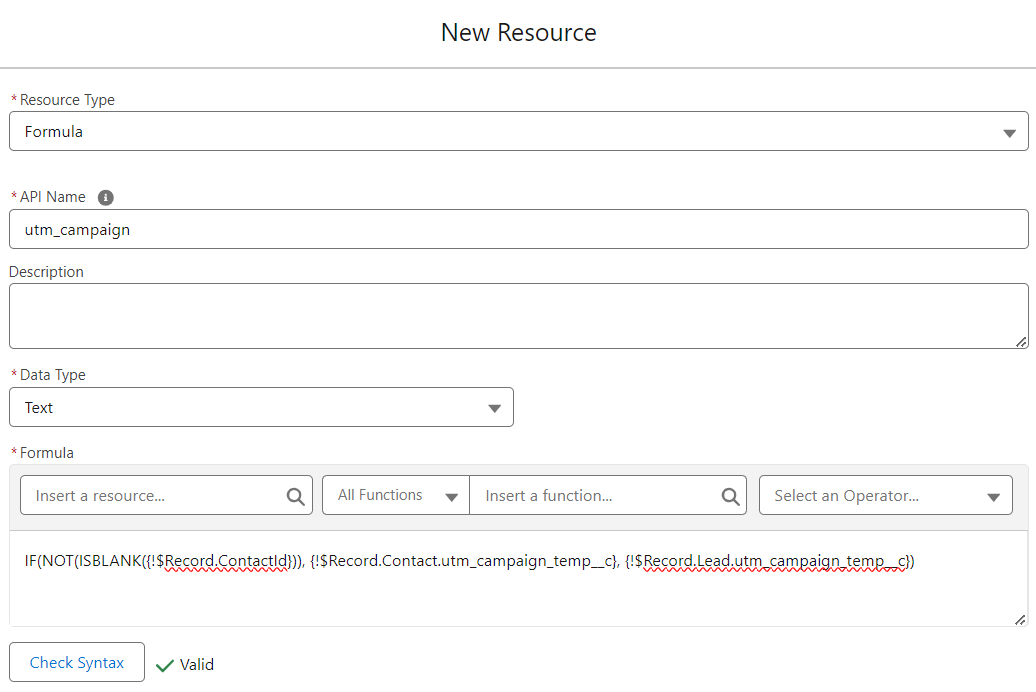
- For each corresponding "Value" field we need to create a new resource that is a formula field that gets the UTM value, landing page value, and conversion page value from the Lead or Contact. Follow these steps:
- Click into the "Value" textbox
- Click "New Resource"
- Select "Formula" as the Resource Type
- Use the following settings for the "New Resource":
- You can copy-and-paste from below (just be sure to update the "utm_campaign__c" portion based on the field):
- Repeat for each of the remaining UTM field values.
- Click Save and give the flow a name and description
- Click "Activate" to turn on the flow
Step #6: Clear the UTM field on Lead/Contact
As a final step, we recommend clearing the UTM, landing page, and conversion page fields on Lead/Contact after a set period of time. We personally like to use 24 hours. This is typically best accomplished using your marketing automation platform, but you can also do it in a scheduled flow.
That's it! You're done. This strategy combined with Align.ly Attribution is a winning combination to know exactly which campaigns, channels, content, and keywords are performing.
Ready to take the next step? Request a demo today.
We will follow-up with you shortly to schedule a day/time that works for you and your team.
Request a Demo