Playbook How to Maintain Perfect Lead, Contact, and Account Ownership in Salesforce
Overview of the Playbook
Outline of the Playbook
Use the following outline as a way to quickly navigate to relevant sections as you implement the 5 Pillars Playbook.
- Why Accurate Lead, Contact, and Account Ownership is Important
- Why Maintaining Accurate Ownership is Challenging
- Introducing the Playbook
- Step-by-Step Guide to Implementing the Playbook
- Define Selling Teams on Accounts
- Orchestrate Account Lifecycle
- Implement Lead-to-Account Matching and Routing
- Configure Lead Assignment Rules
- Automate Owner Realignment
Why Accurate Lead, Contact, and Account Ownership is Important
Having accurate ownership of records across your Salesforce organization has a massive impact on the efficiency and productivity of your entire revenue team. Areas include:
- Quick lead follow-up times
- Routing new leads to the right owners
- Lead revisit and reengagement notifications
- Duplicate account prevention
- Accountability through reliable ownership
- Increased productivity of sales reps
Why Maintaining Accurate Ownership is Challenging
Most RevOps teams in B2B struggle with maintaining proper ownership across leads, contacts, and accounts in Salesforce. What seems simple on the surface is complicated by many factors including:
- Territory changes
- Role changes
- Named accounts and hold-out accounts
- Sellers joining/leaving the company
- Multiple sellers in the same account (SDR/BDR, AE, CS, etc)
- Hand-off points in an account (SDR/BDR -> AE, AE -> CS, etc)
- The lead <> contact/account divide
- And more...
As you can see, there are numerous reasons why lead, contact, and account ownership might change and many layers of complexity admins need to account for while designing a strategy to keep records in Salesforce aligned to the right owners.
Introducing the Playbook
We are excited to bring to you an outline of a playbook that makes it simple to implement and operationalize processes to assign and maintain ownership across your ever evolving Salesforce environment.
Advantages of the Playbook include:
- Holistic Approach
- Simple, yet Flexible
- Native Salesforce
- Cost-Effective
The Playbook solves the challenges around ownership, lead-to-account matching, lead routing, and owner realignment in a way that is real-time, automated, scalable, and easy to maintain.
The Playbook is incredibly easy to implement, operationalize, and maintain. Having said that, it's also incredibly flexible and easy adapt to your specific business processes and use cases.
The Playbook is 100% native Salesforce, which means data stays in your Salesforce org, there are no API calls, and matching/routing happen instantly. Additionally, being native Salesforce means as an admin you ultimately have full control.
The Playbook does require Align.ly Lead-to-Account, which starts at $1,999/year for a company license. Based on the size of your team, the Playbook should save hundreds of hours a year making the return-on-investment a no-brainer.
Step-by-Step Guide to Implementing the Playbook
The following steps are designed to be as detailed and thorough as possible, yet remain flexible so that you can modify them to meet the needs of your internal business processes. If you have any questions and/or a unique use case you'd like to discuss, please feel free to reach out with questions. We are more than happy to discuss best practices and how to accommodate your unique use cases.
1. Define Selling Teams on Accounts
The first step in the Playbook is to define your selling teams on all your accounts in Salesforce.
Defining your selling teams is only necessary if during the lifecycle of an account you have multiple owners. For example, you might have a Business Development Representative (BDR) that is responsible for prospecting into an account, then an Account Executive (AE) that works open opportunities, and finally a Customer Success Manager (CSM) responsible for existing customers.
NOTE: If you have one person responsible for the entire lifecycle of an account, it is not necessary to define the selling team. Instead, you will simply use the "Account Owner" field.
Here is an example of what your selling team might look like on the account:
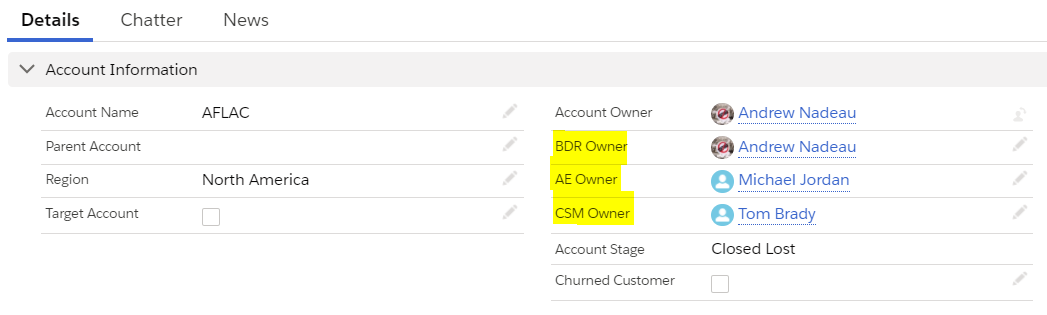
As demonstrated, in addition to the Account Owner, we added User Lookup fields for "BDR Owner", "AE Owner", and "CSM Owner".
How to Create User Look-Up Fields on Account
- Go to Setup -> Object Manager -> Account
- Click "Fields & Relationships"
- Click "New"
- For Data Type, select "Lookup Relationship"
- For Related To, select "User"
- Add a Field Label (ie "AE Owner"). The defaults for Field Name and Child Relationship Name should be satisfactory.
- Select your preferences for Visible and Read-Only
- Add the new field to the appropriate Page Layouts
- Click "Save"
You're done! Now repeat steps 1-9 for each additional User Lookup field you want to create.
2. Orchestrate Account Lifecycle
Now that we've defined the selling teams on our accounts in Salesforce. It's time to orchestrate the account lifecycle. This will be a 3 part process. First, we will create 3 opportunity roll-up fields, a formula field, and a checkbox field on Account. Second, we will use our new Account fields to create a formula field on Account for "Account Stage". Third, we will setup a simple Process Builder that automatically updates the Account Owner based on the Account Stage.
1.) Creating custom fields on Account
In order to orchestrate the account lifecycle, we will need to create the following 5 custom fields on Account:
- Total Open Opportunities
- Data Type: Roll-Up Summary
- Field Label: Total Open Opportunities
- Field Name: Total_Open_Opportunities
- Summarized Object: Opportunities
- Roll-Up Type: Count
- Filter Criteria:
- Closed equals False
- Total Won Opportunities
- Data Type: Roll-Up Summary
- Field Label: Total Won Opportunities
- Field Name: Total_Won_Opportunities
- Summarized Object: Opportunities
- Roll-Up Type: Count
- Filter Criteria:
- Won equals True
- Total Lost Opportunities
- Data Type: Roll-Up Summary
- Field Label: Total Lost Opportunities
- Field Name: Total_Lost_Opportunities
- Summarized Object: Opportunities
- Roll-Up Type: Count
- Filter Criteria:
- Won equals False
- Closed equals True
- Total Opportunities
- Data Type: Formula
- Field Label: Total Opportunities
- Field Name: Total_Opportunities
- Formula Return Type: Number
- Decimal Places: 0
- Advanced Formula:
- Total_Lost_Opportunities__c + Total_Open_Opportunities__c + Total_Won_Opportunities__c
- Churned Customer
- Data Type: Checkbox
- Field Label: Churned Customer
- Field Name: Churned_Customer
- Default Value: Unchecked
2.) Creating the Account Stage Field
The Account Stage field is going to be a custom formula field that automatically updates based on the custom fields we created in the previous step. In this example, we are going to use the following Account Stage definitions:
- Prospect
- Pipeline
- Customer
- Closed Lost
- Churned Customer
Account has never had an Opportunity on it.
Account has an open Opportunity and no closed won Opportunities.
Account has a closed won Opportunity, but is not marked as a Churned Customer.
All Opportunities on the Account are closed lost.
Account has a closed won Opportunity, but has been marked as a Churned Customer.
Now that we have the account stages defined, it's time to create the "Account Stage" custom field on Account:
- Account Stage
- Data Type: Formula
- Field Label: Account Stage
- Field Name: Account_Stage
- Formula Return Type: Text
- Advanced Formula:
- IF(Total_Opportunities__c = 0, "Prospect", IF(Total_Open_Opportunities__c > 0 && Total_Won_Opportunities__c = 0, "Pipeline", IF(Churned_Customer__c != True && Total_Won_Opportunities__c > 0, "Customer", IF(Total_Lost_Opportunities__c > 0 && (Total_Lost_Opportunities__c == Total_Opportunities__c), "Closed Lost", IF(Churned_Customer__c = True && Total_Won_Opportunities__c > 0, "Churned Customer", "ERROR")))))
3.) Creating the Process Builder to Update Account Owner based on Account Stage
Now that we have Account Stage automatically updating based on the statuses of the underlying Opportunities, we can map the Account Stages to the appropriate selling team member and dynamically update the Account Owner.
In this example, here is how we are going to map our selling team to the account stages:
- Prospect -> BDR
- Pipeline -> AE
- Customer -> CSM
- Closed Lost -> BDR
- Churned Customer -> BDR
Here is how to setup the Process Builder:
- Go to Setup -> Process Builder -> New
- Name the Process "Update Account Owner from Account Stage"
- For "The process starts when" select "A record changes"
- Click "Save"
- Click "Add Object"
- Select "Account" and for "Start the process" select "when a record is created or edited"
- Click "Save"
- Click "Add Criteria"
- Criteria Name: For BDR?
- Criteria for Executing Actions: Conditions are met
- Set Conditions
- [Account].Account_Stage__c Equals String Prospect
- [Account].Account_Stage__c Equals String Closed Lost
- [Account].Account_Stage__c Equals String Churned Customer
- [Account].BDR_Owner__c Does not equal Global Constant $GlobalConstant.Null
- Conditions: Customize the logic
- Logic: (1 OR 2 OR 3) AND 4
- Click "Add Action" next to "For BDR?"
- Action Type: Update Records
- Action Name: Update Account Owner to BDR Owner
- Record Type: Select the Account record that started your process
- Criteria for Updating Records: No criteria-just update the records!
- Set new field values for the records you update
- Owner ID Field Reference [Account].BDR_Owner__c
- Click "Save"
- Click "Add Criteria"
- Criteria Name: For AE?
- Criteria for Executing Actions: Conditions are met
- Set Conditions
- [Account].Account_Stage__c Equals String Pipeline
- [Account].AE_Owner__c Does not equal Global Constant $GlobalConstant.Null
- Conditions: All of the conditions are met (AND)
- Click "Save"
- Click "Add Action" next to "For AE?"
- Action Type: Update Records
- Action Name: Update Account Owner to AE Owner
- Record Type: Select the Account record that started your process
- Criteria for Updating Records: No criteria-just update the records!
- Set new field values for the records you update
- Owner ID Field Reference [Account].AE_Owner__c
- Click "Save"
- Click "Add Criteria"
- Criteria Name: For CSM?
- Criteria for Executing Actions: Conditions are met
- Set Conditions
- [Account].Account_Stage__c Equals String Customer
- [Account].CSM_Owner__c Does not equal Global Constant $GlobalConstant.Null
- Click "Save"
- Click "Add Action" next to "For CSM?"
- Action Type: Update Records
- Action Name: Update Account Owner to CSM Owner
- Record Type: Select the Account record that started your process
- Criteria for Updating Records: No criteria-just update the records!
- Set new field values for the records you update
- Owner ID Field Reference [Account].CSM_Owner__c
- Click "Save"
3. Implement Lead-to-Account Matching and Routing
Implementing a good lead-to-account matching solution has a lot of benefits for a RevOps team. In the Playbook we recommend you implement Align.ly Lead-to-Account. There are 3 core features that make it the perfect solution for the Playbook:
- Real-time lead-to-account matching and routing (see below)
- Seamless integration with Salesforce's Lead Assignment Rules (see Step #4)
- Propriety "Owner Realign" functionality (see Step #5)
In this section we are not going to outline how to fully implement Align.ly Lead-to-Account. Visit Getting Started with Align.ly Lead-to-Account for full documentation and step-by-step video walkthroughs.
4. Configure Lead Assignment Rules
Now that we have Align.ly Lead-to-Account matching and routing leads to the Account Owner in real-time, we can configure our Lead Assignment Rules in Salesforce.
Your Lead Assignment Rules will depend on how your team is structured. For example, your sales team might be territory based and therefore your Lead Assignment Rule are based on geography. Another example would be that you round robin net new leads to your SDRs/BDRs.
Regardless, with Align.ly Lead-to-Account, when a net new lead matches an Account, we want to update the Lead Owner to match the Account Owner (which will align to the Account Stage configured in Step #2).
Here is an example of how you might configure your Lead Assignment Rules:
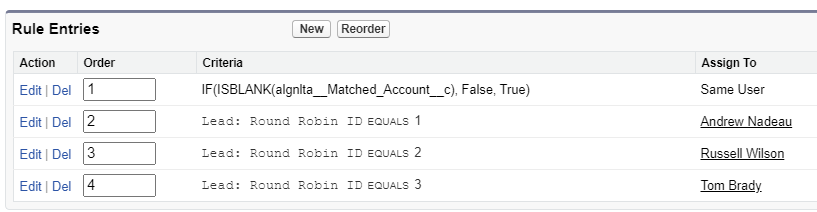
In the example above, Align.ly Lead-to-Account will match and route (update Lead Owner) BEFORE the Lead Assignment Rules run. So, in Rule #1, if the Matched Account field is not blank, the Lead Owner will stay as the "Same User" since Align.ly Lead-to-Account has already updated the Lead Owner to match the Account Owner.
If a net new Lead does not match an Account, then the Lead will round robin to various Lead Owners. If you want to implement a Lead round robin, you can follow these instructions on How to Create a Round Robin Lead Assignment Rule from Salesforce.
5. Automate Owner Realignment
As you know, Account Ownership and Lead Assignment Rules are constantly changing in Salesforce, so how to you ensure that all the Matched Leads, Unmatched Leads, and Contacts have the proper owner at all times?
When using Align.ly Lead-to-Account, you can automate Lead and Contact Owner. Here's how the feature looks in the app:

- Matched Lead Owner Realign
- Unmatched Lead Owner Realign
- Contact Owner Realign
If a Lead has a Matched Account (updated by Align.ly Lead-to-Account), then the Lead Owner will always stay in alignment with the Account Owner.
If a Lead is not matched to an Account, it can automatically be re-run through Lead Assignment Rules.
For Contacts, the Contact Owner will stay in alignment with the Account Owner.
When utilizing the Owner Realignment feature, as an admin, all you need to do is ensure your Selling Teams are correct on the Accounts and your Lead Assignment Rules are up-to-date. If those two items are done properly, you will have accomplished perfect Lead, Contact, and Account ownership across your Salesforce organization. Congrats!
Ready to take the next step? Request a demo today.
We will follow-up with you shortly to schedule a day/time that works for you and your team.
Request a Demo