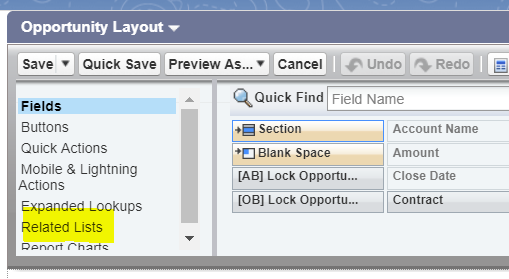
Getting Started

Align.ly Attribution

  • Installing the Salesforce App

    There are two steps to install the Align.ly Attribution app in your Salesforce environment.

    Step #1: Install the managed package from the Salesforce AppExchange

    1. Go to the Align.ly Attribution listing on the Salesforce AppExchange at https://appexchange.salesforce.com/appxListingDetail?listingId=a0N3A00000GAZGYUA5
    2. When installing, select "Install for All Users" then click "Install".

    Step #2: Install the unmanaged package from the link below

    To install Align.ly Attribution from the Salesforce AppExchange, follow these steps:

    1. Go to the Align.ly Attribution listing on the Salesforce AppExchange at https://appexchange.salesforce.com/appxListingDetail?listingId=a0N3A00000GAZGYUA5
    2. When installing, select "Install for All Users" then click "Install".

    Last Updated: December 9, 2020 at 11:43 AM ET

  • Adding Campaign Member Related Lists to Opportunity

    To add Campaign Member Related Lists to Opportunity, follow the these steps:

    1. Go to Setup -> Object Manager -> Opportunity -> Page Layouts
    2. Select the Opportunity Page Layout you'd like to update (you may need to repeat these steps for more than one page layout)
    3. Navigate to "Related Lists"
    4. Based on if you plan on using Account-Based attribution, Opportunity-Based attribution, or both, drag the appropriate related lists into your page layout
    5. Click the wrench icon on the related list and update the columns accordingly. Here are our recommended columns:
    6. Sort your related list by "Engagement Date" and choose "Descending"
    7. Save your page layout and that's it!

    Last Updated: December 9, 2020 at 11:43 AM ET

  • Updating the Campaign Member Page Layout

    1. Go to Setup -> Object Manager -> Campaign Member -> Page Layouts
    2. Select the Campaign Member Page Layout you'd like to update (you may need to repeat these steps for more than one page layout)
    3. Select "Fields" and then drag in 3 Sections
    4. Select "2-Column" Layout and name the sections the following:
      • a. Align.ly Attribution - Associated Opportunity and Attribution Type
      • b. Align.ly Attribution - Weights
      • c. Align.ly Attribution - Amounts
    5. In the "Align.ly Attribution - Associated Opportunity and Attribution Type" section, add the following fields:
      • a.) Column #1
        • [AB] Associated Opportunity
        • [AB] Attribution Type
      • b.) Column #2
        • [OB] Associated Opportunity
        • [OB] Attribution Type
    6. Click save and that's it for now!

    Later we will create and add custom fields to the "Align.ly Attribution - Weights" and "Align.ly Attribution - Amounts" sections.

    Last Updated: December 9, 2020 at 11:43 AM ET

  • Overview of Align.ly Attribution Custom Settings

    Last Updated: December 9, 2020 at 11:43 AM ET

  • Running Align.ly Attribution for the First Time

    Last Updated: December 9, 2020 at 11:43 AM ET